Client Side Service Discovery in Spring Boot With Netflix Eureka
Table of Content
- Introduction
- Pre-requisite
- Architecture
- Eureka Service Registry Server
- Address Service (Eureka Client)
- Mail Service (Eureka Client)
- Tips & Tricks
Introduction
As you know these days, there is a lot of momentum around Microservices. The transition from Monolithic to Microservice based architecture gives many benefits for future in terms of maintainability, scalability, high availability etc. However, at the same time, there are many challenges. One of them is to maintain individual microservices locations. This task is complex in a world where services are deployed in containers. The service location (host:port) is dynamically assigned and the number of instances changes dynamically based on autoscaling, failure and upgrades.
Netflix OSS provides a great solution for the above problem by providing a framework for Client-Side Service Discovery. Netflix Eureka is a service registry. It provides a REST API for managing service-instance registration and for querying available instances. Netflix Ribbon is an IPC client that works with Eureka to load balance requests across the available service instances. A service instance registers its network location with service registry using a POST request. Every 30 seconds it must refresh its registration using a PUT request. A registration is removed by either using an HTTP DELETE request or by the instance registration timing out. As you might expect, a client can retrieve the registered service instances by using an HTTP GET request.
Pre-requisite
- Java 1.8 or newer
- IntelliJ or Eclipse IDE
Architecture
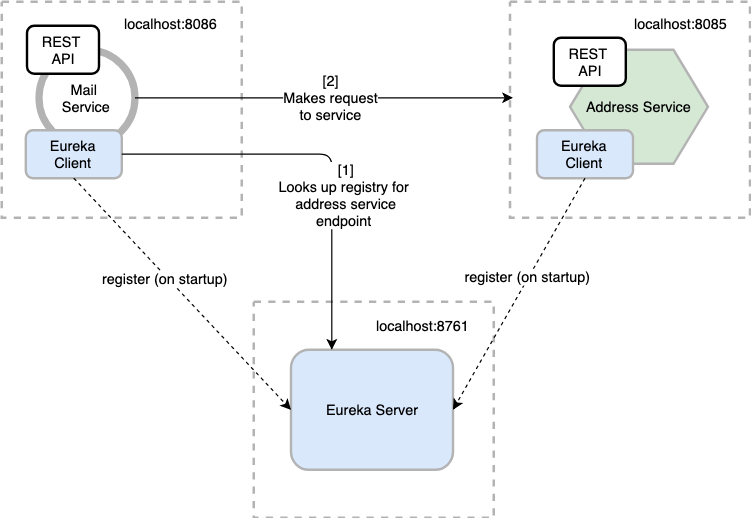
In order to better explain this concept, I have chosen above example of a Mailing Service. It is a pretty simple microservice based architecture. In order for the mailing service to work it requires receiver’s address from the address service. Therefore you can say that mailing service has a dependency on address service. In this example, mailing service obtains the location of address service from Eureka Server. Both mailing service and address service registers themselves with Eureka Server during startup.
Note: It is important to note that the services involved in this example are mocked services and are not connected to any third-party mail vendors or database. Everything is stored in-memory to keep things simple, as this post is about client-side service discovery and not on building a mailing service.
You will create three microservices for this example.
- Eureka Service Registry Server: This microservice will provide the service registry and discovery server.
- Address Service Microservice: Which provides user’s address required for sending mail. It will be a rest based service and most importantly it will be a eureka client service, which will talk with eureka service to register itself in the service registry.
- Mailing Service Microservice: Which provides functionality to send mails to user by obtaining address from address service. You’ll not use absolute URL to interact with address service. However, the URL will be looked up at running from Eureka Service Registry Server.
Eureka Service Registry Server
Bootstrapping Eureka Server
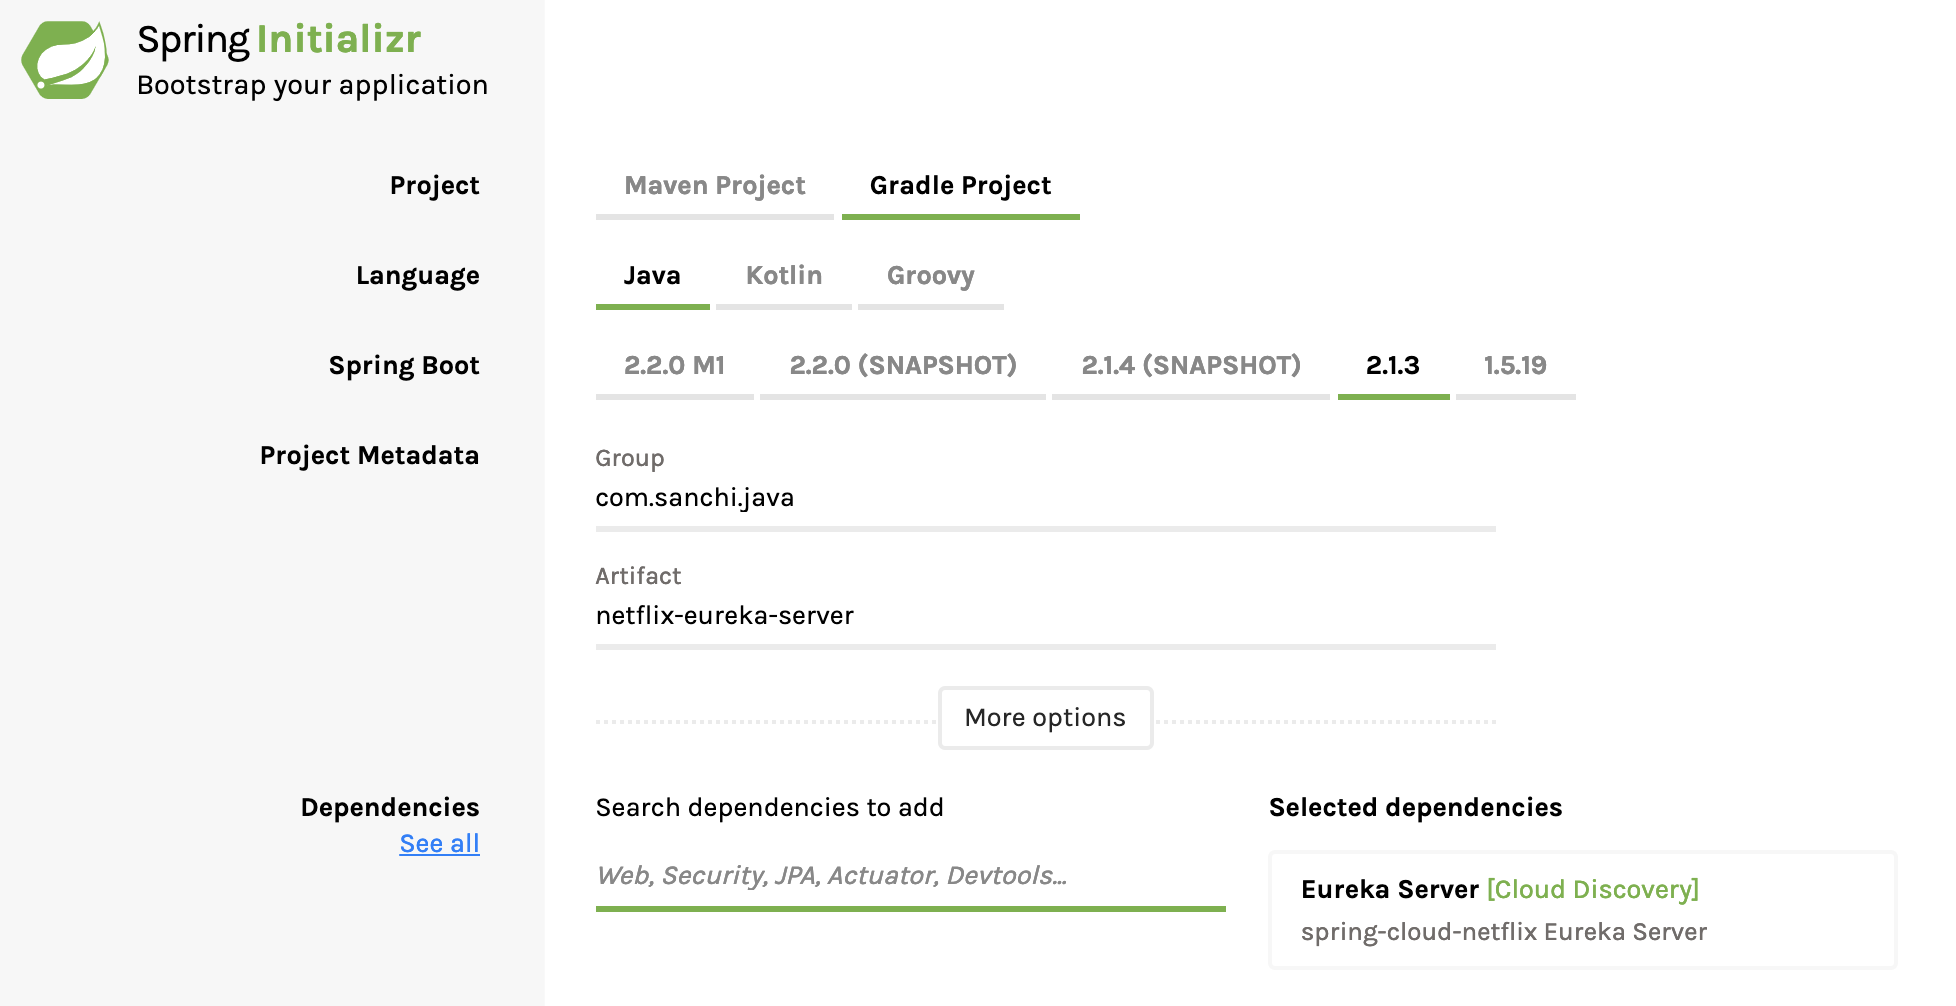
Let’s use Spring Initializr to bootstrap a Eureka server. Fill the form as shown below and click on Generate Project to download the project. Here I have included Eureka Server as the dependency.
Server Configuration
Unzip and open the project in your favorite IDE. I am using IntelliJ in this post. Now open NetflixEurekaServerApplication class that spring already has generated in the download project and add @EnableEurekaServer annotation as shown below.
@EnableEurekaServer
@SpringBootApplication
public class NetflixEurekaServerApplication {
	public static void main(String[] args) {
		SpringApplication.run(NetflixEurekaServerApplication.class, args);
	}
}
With this annotation, this spring boot application will act like a service registry. Next, add following properties to application.yml
server:
  port: 8761 # port on which eureka server will be available

spring:
  application:
    name: netflix-eureka-server # name of eureka server

eureka:
  client:
    register-with-eureka: false
    fetch-registry: false

logging:
  level:
    com:
      netflix:
        eureka: OFF
        discovery: OFF
When the registry starts up it will complain, with a stack trace, that there are no replica nodes for the registry to connect to. In a production environment, you will want more than one instance of registry. For our simple purpose, however, it suffices to disable the relevant logging.
By default, the registry will also attempt to registry itself, so you’ll need to disable that, as well. Above properties will help to handle all these requirements.
Test Eureka Server
Start the application as a spring boot application. Open browser and go to http://localhost:8761/, you should see the eureka server home page which looks like below.
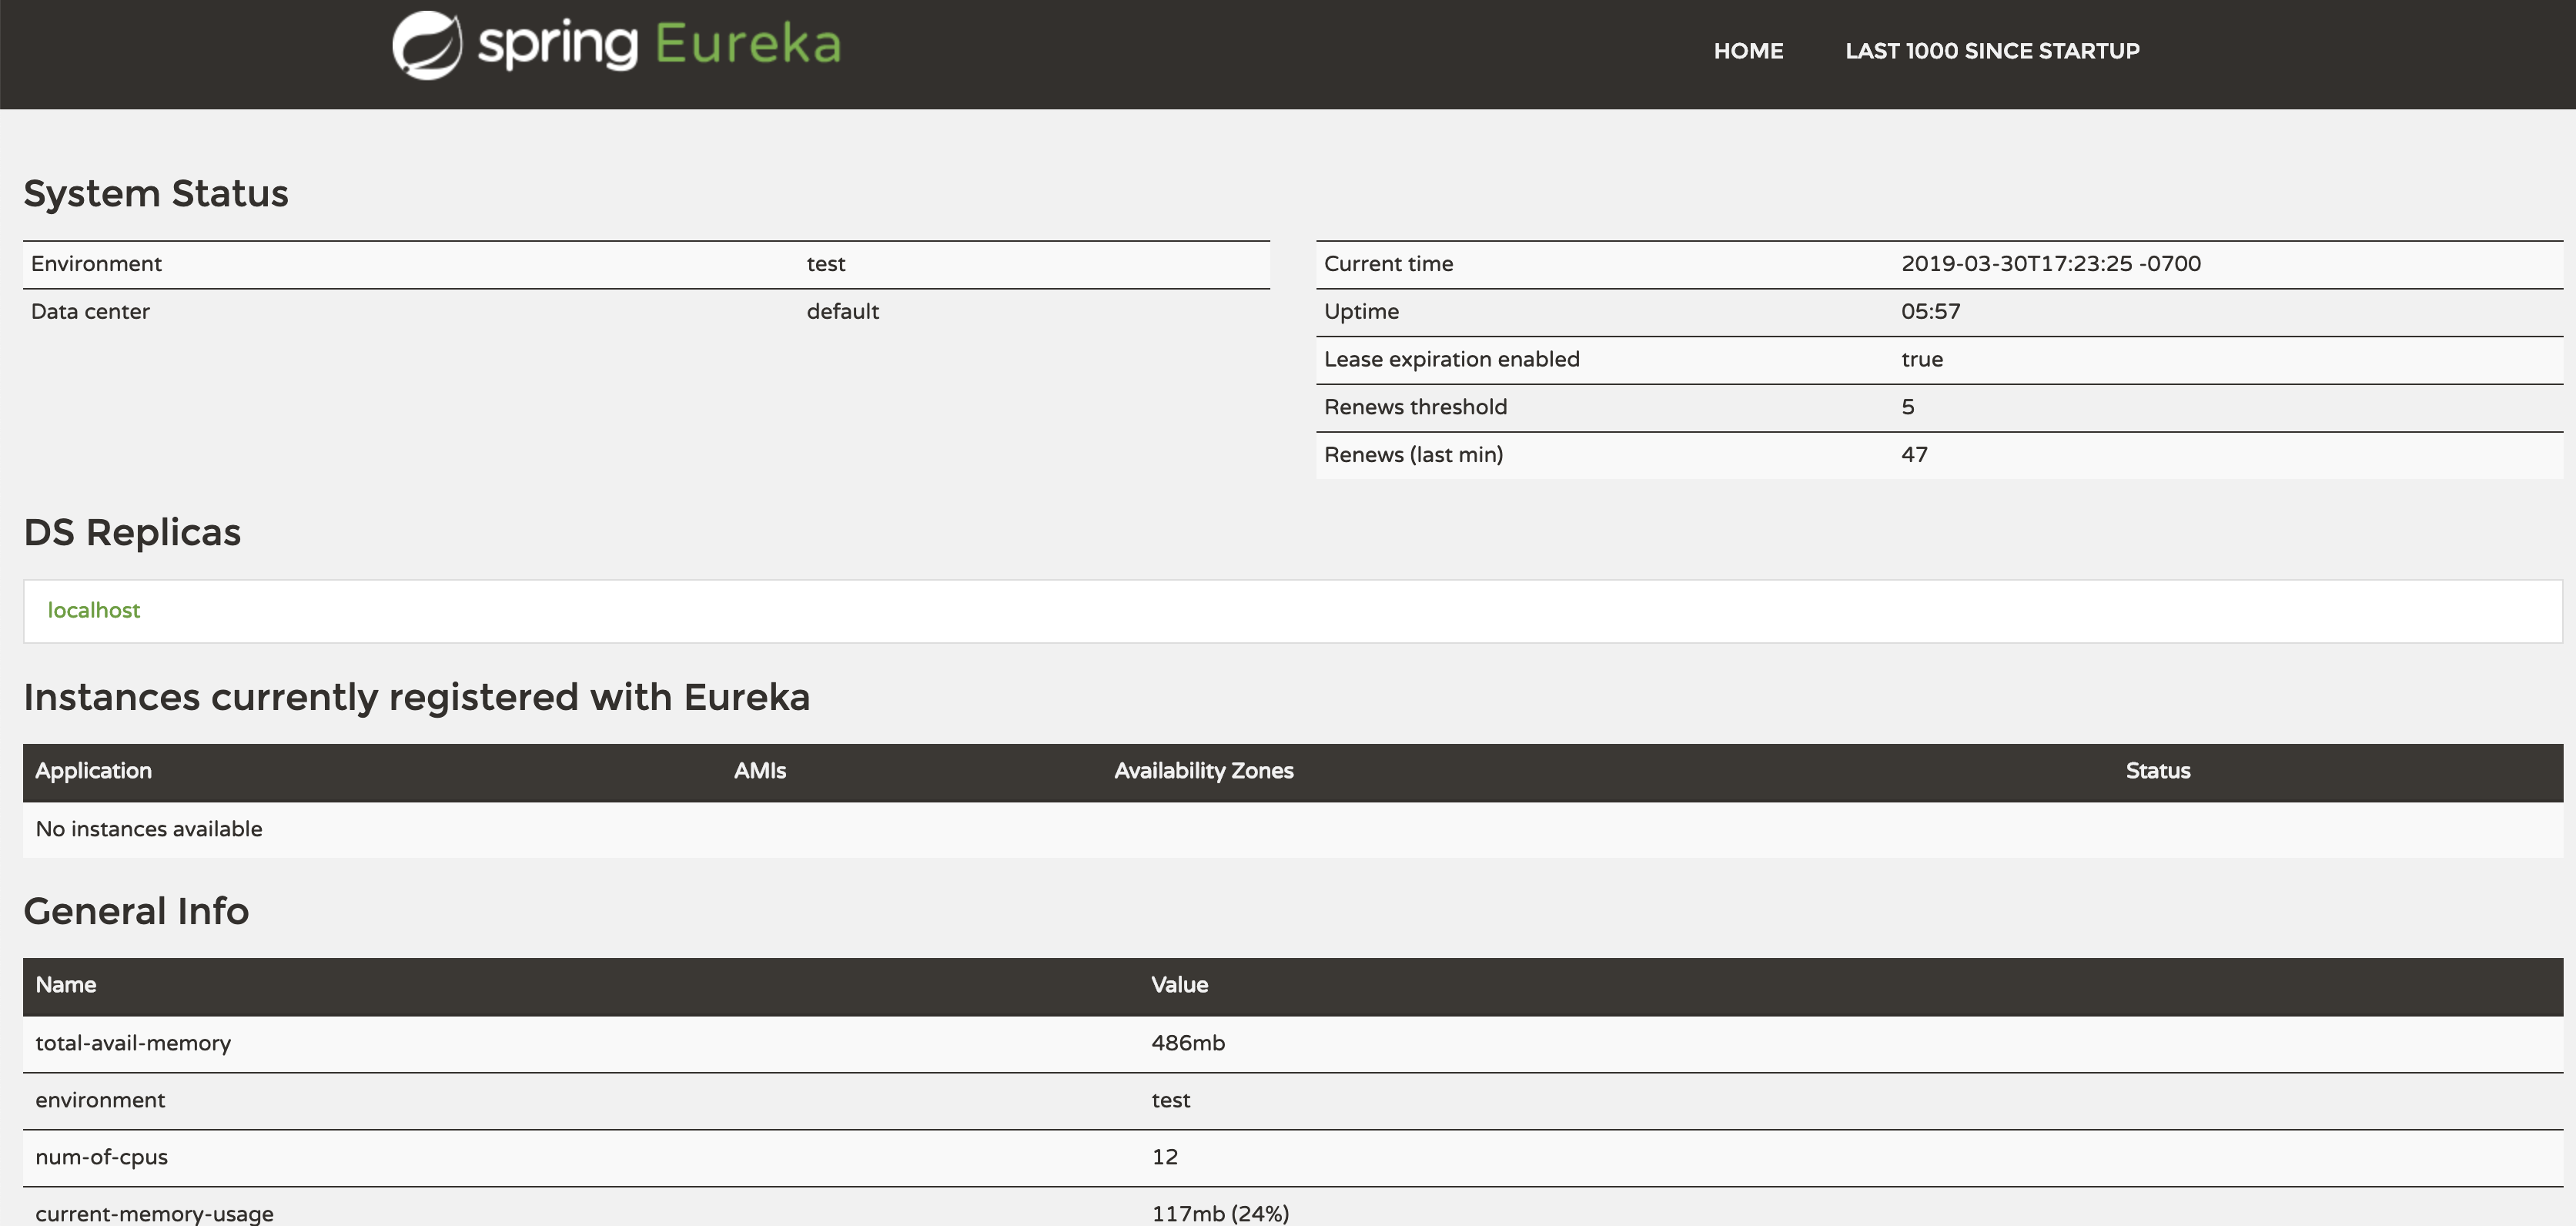
Please note that at this point no service has been registered here, which is as expected. Once you will spin up the client services(explained below), this server will automatically be updated with the details.
Address Service (Eureka Client)
Bootstrapping Address Service
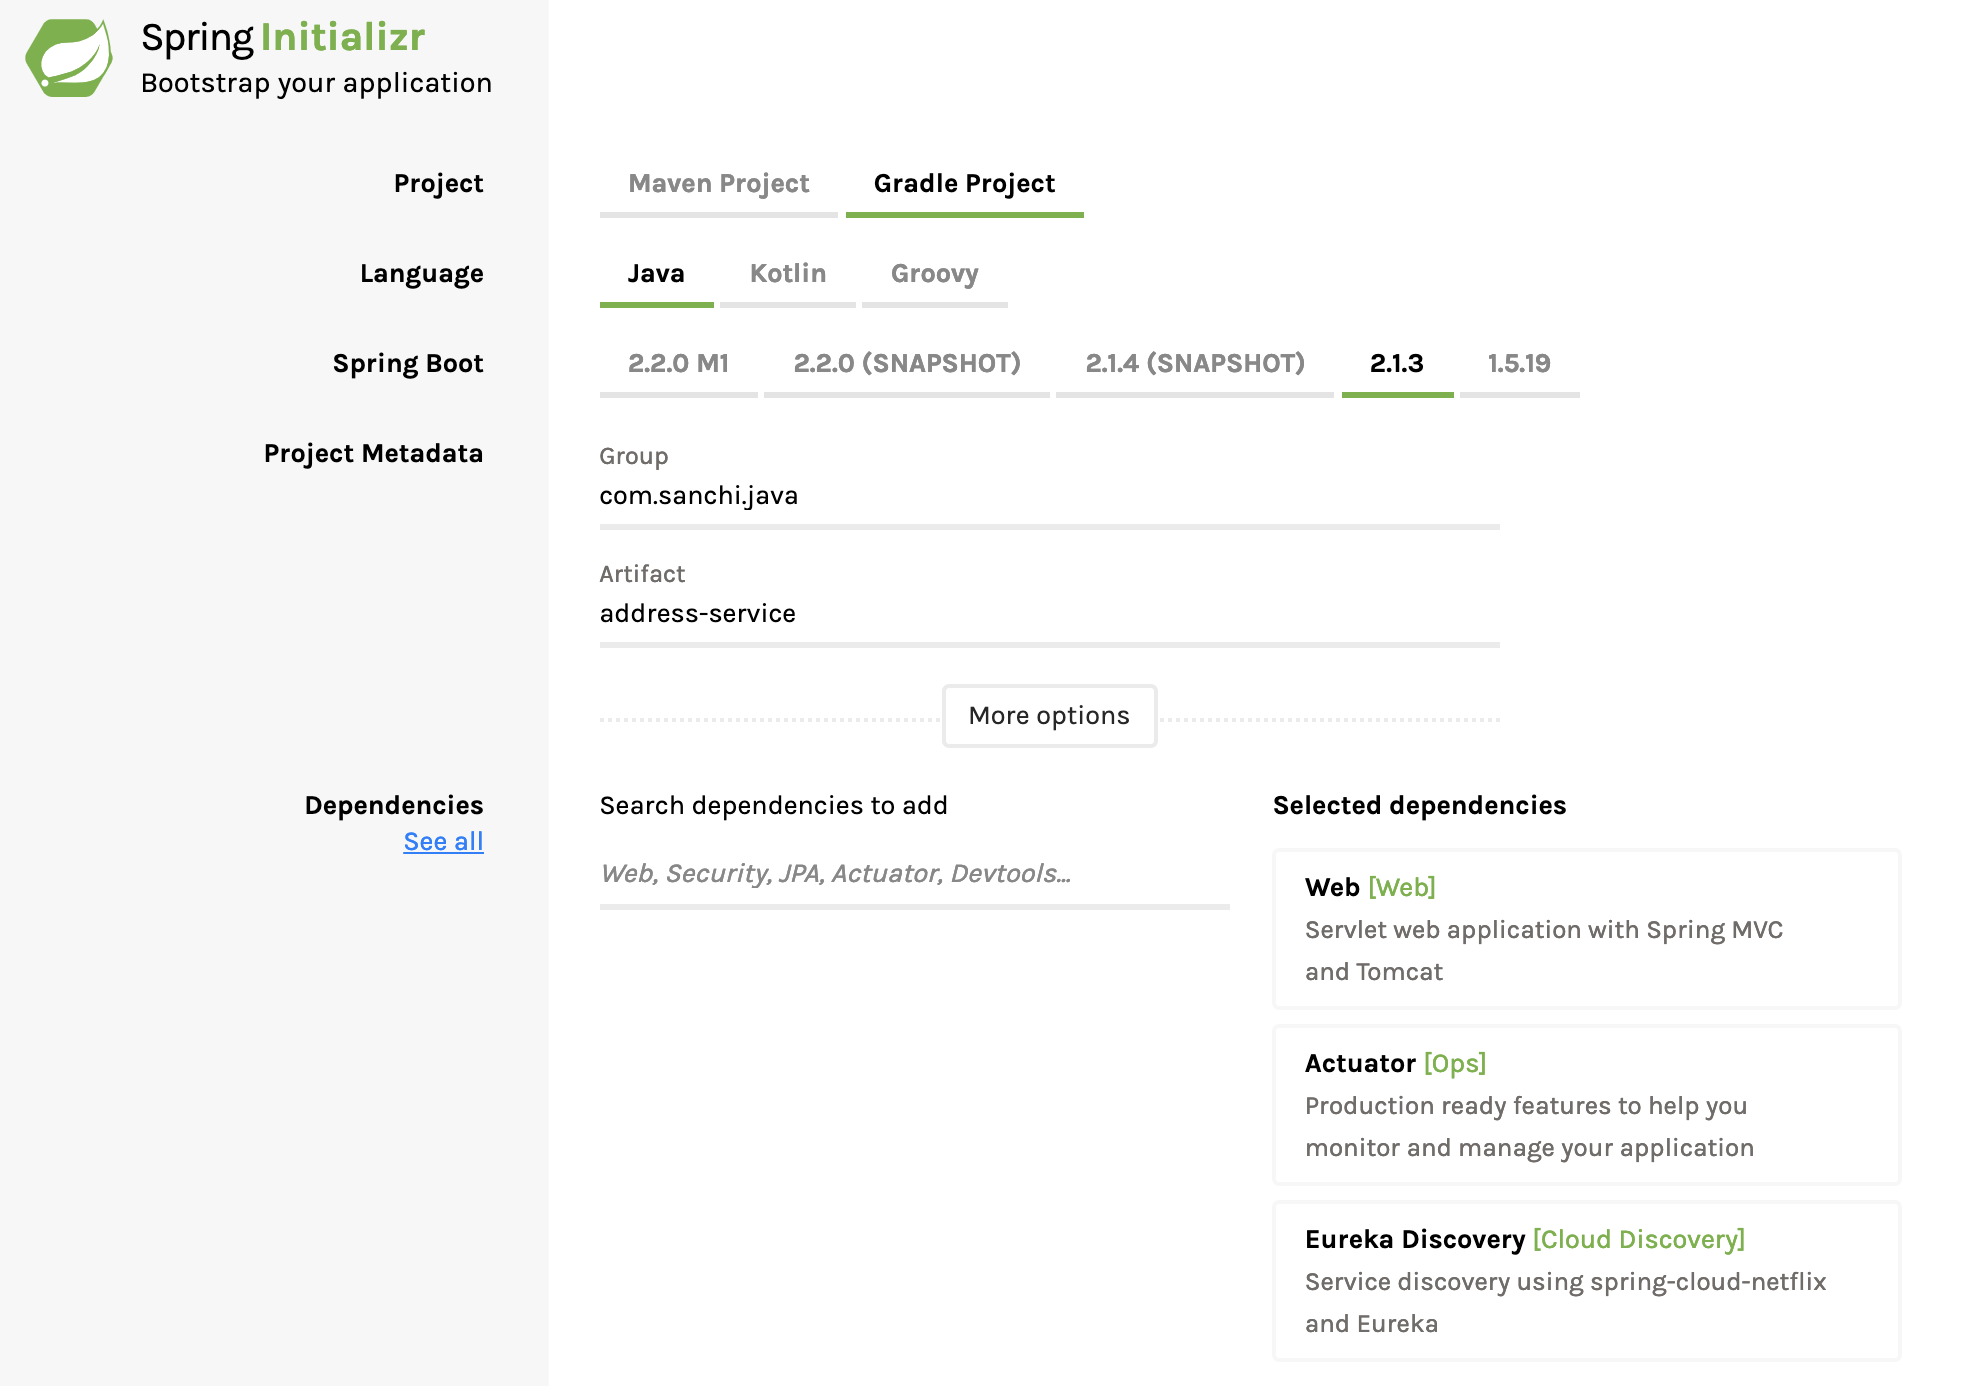
Let’s use Spring Initializr to bootstrap address service. Fill the form as shown below and click on Generate Project to download the project. Here I have included Web, Actuator and Eureka Discovery as the dependencies.
Client Configuration
Unzip and open the project with your favorite IDE. In this post I am using IntelliJ as the IDE. Now add @EnableEurekaClient annotation to AddressServiceApplication class as shown below.
@EnableEurekaClient
@SpringBootApplication
public class AddressServiceApplication {
	public static void main(String[] args) {
		SpringApplication.run(AddressServiceApplication.class, args);
	}
}
With this annotation, this spring boot application will be able to register itself with Eureka server as a client. Now, add below properties to your application.yml file.
server:
  port: 8085 # port at which the service will be available
spring:
  application:
    name: address-service

info: # basic application info to be made available under /info
  app:
    name: address-service
    description: Service to provide user's address
    version: 1.0.0

eureka:
  instance:
    leaseRenewalIntervalInSeconds: 1
    leaseExpirationDurationInSeconds: 2
  client:
    serviceUrl:
      defaultZone: http://127.0.0.1:8761/eureka/
    healthcheck:
enabled: true- spring.application.name: This property sets the application name which is used as a key while registering the service with Service Registry. By default the value is `Application’. However if you have multiple types of services then provide unique name for all of them.
- eureka.instance.*: These properties set the instance behavior. For more details check EurekaInstanceConfigBean.
- client.serviceUrl.defaultZone: This property sets the network location as which Eureka server is available.
- client.healthcheck.enabled: By default, Eureka uses the client heartbeat to determine if a client is up. Unless specified otherwise, the Discovery Client does not propagate the current health check status of the application, per the Spring Boot Actuator. Consequently, after successful registration, Eureka always announces that the application is in ‘UP state. This behavior can be altered by enabling health checks, which results in propagating application status to Eureka. As a consequence, Eureka does not send traffic to applications which are in states other than ‘UP’.
Adding REST Endpoint
Now let’s add a RestController and expose a rest endpoint for getting user’s address. For simplicity, this service mocks the address details.
@RestController
public class AddressController {

  @Autowired
  private AddressDataService dataService;

  @GetMapping("/{member-id}/address")
  public ResponseEntity<Address> getAddress(@PathVariable("member-id") int memberId) {
    Address address = dataService.getAddress(memberId);
    return ResponseEntity.ok(address);
  }
}
Test Address Service
Start this project as spring boot application. Now verify that this service has registered itself with Eureka server automatically. Under Eureka server home page you should now see mail-service under the list of registered instances.

Let’s now validate the endpoint exposed by address service. Go to the browser and access below endpoint to obtain mock address for user 1.
Request
HTTP GET -> http://sanchis-mbp:8085/1/addressResponse Body
{
    "addressLine1": "3434 Anderson Avenue",
    "addressLine2": "Apt# 420",
    "city": "San Jose",
    "state": "California",
    "zipCode": "92130",
    "country": "United States"
}
Mail Service (Eureka Client)
Bootstrapping Mail Service
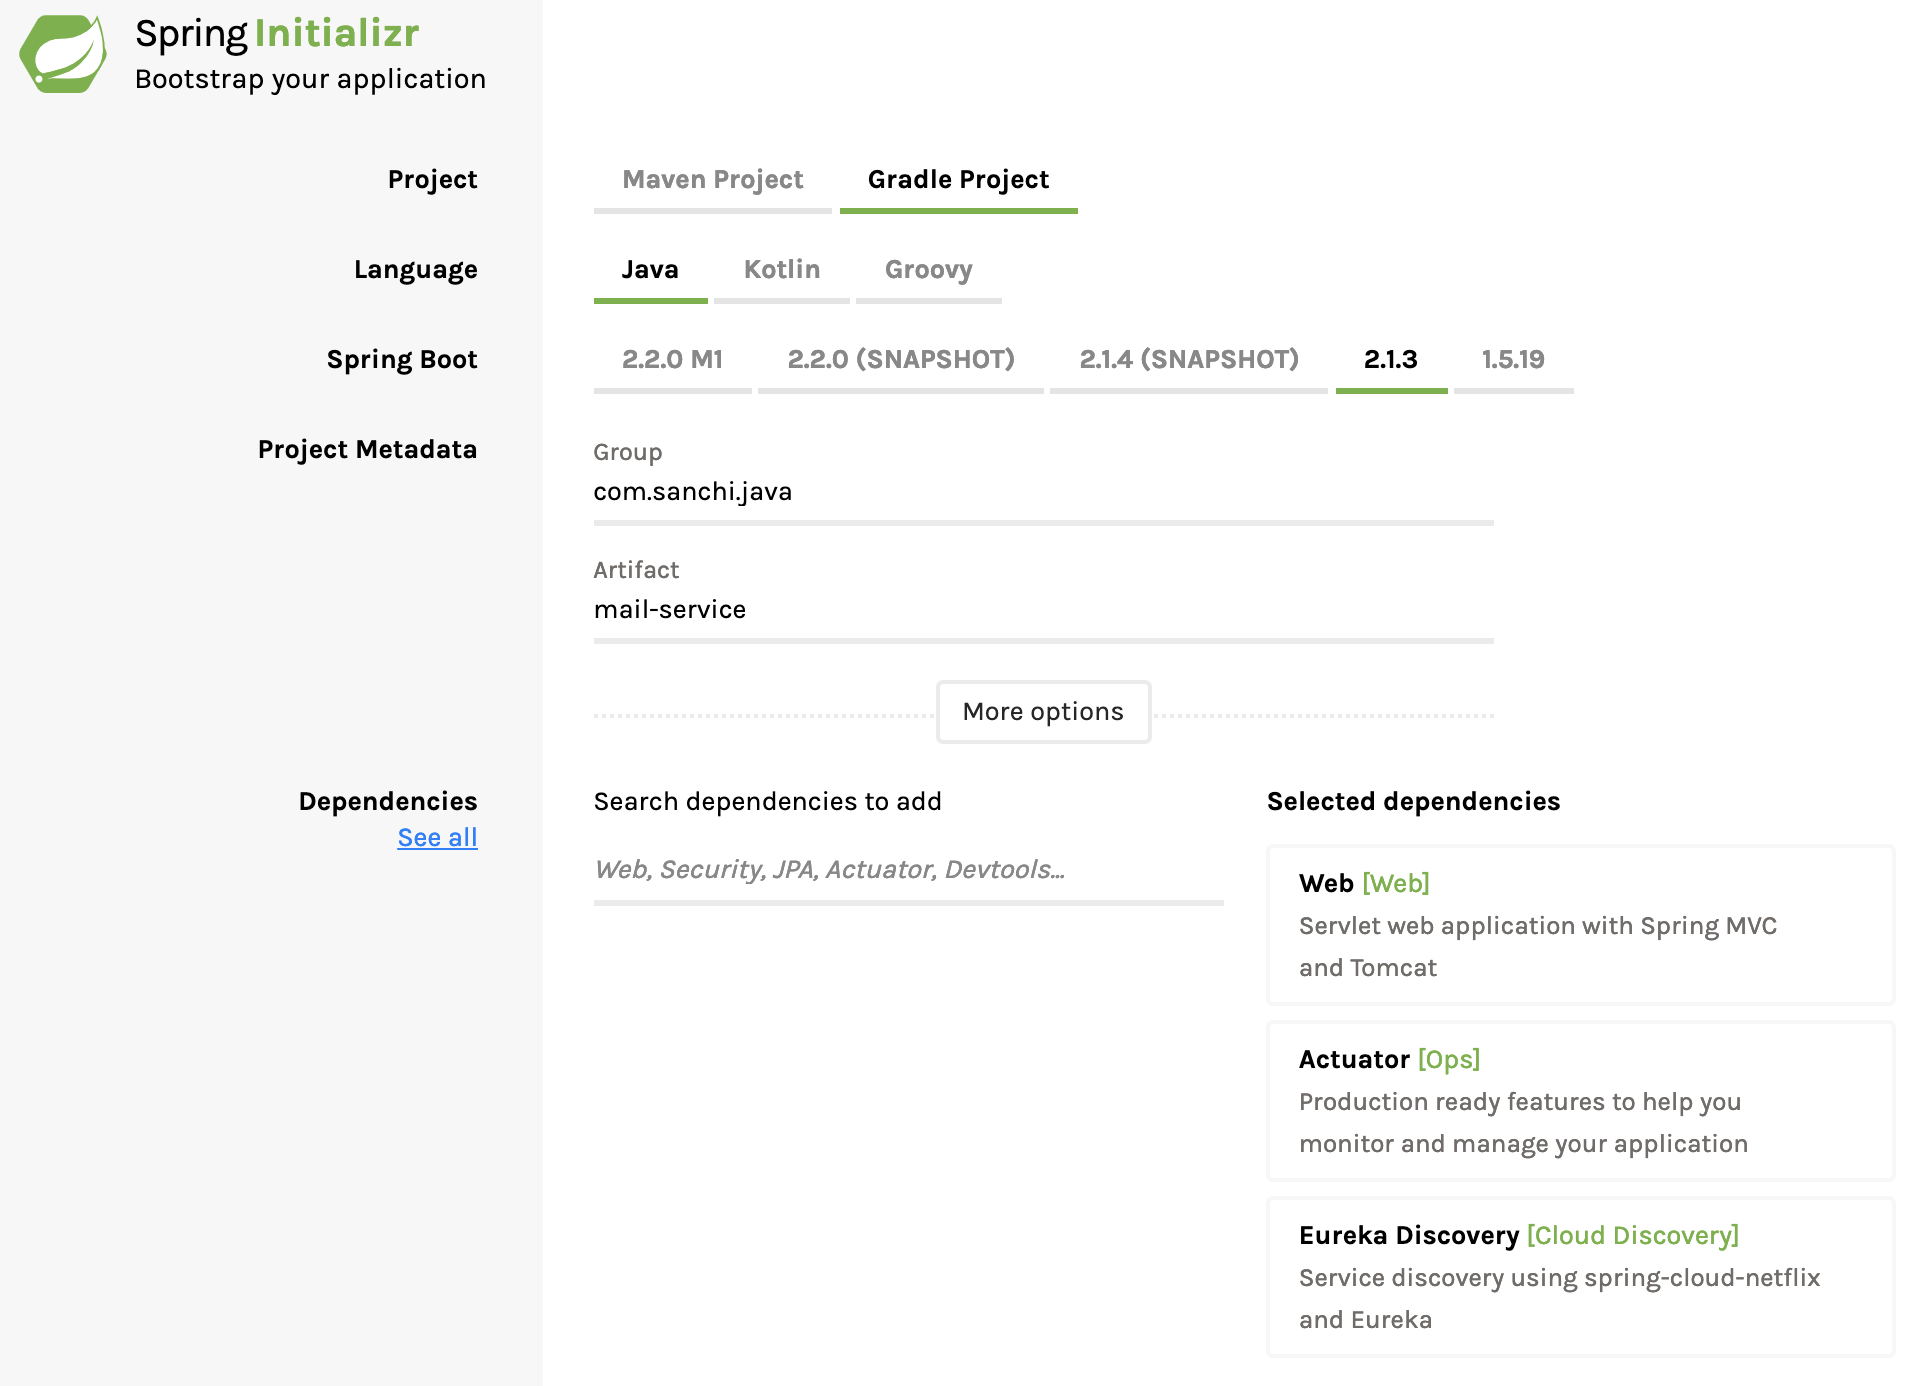
Let’s use Spring Initializr to bootstrap mail service. Fill the form as shown below and click on Generate Project to download the project. Here I have included Web, Actuator and Eureka Discovery as the dependencies.
Client Configuration
Unzip and open the project with your favorite IDE. In this post I am using IntelliJ as the IDE. Now add @EnableEurekaClient annotation to MailServiceApplication class as shown below.
@EnableEurekaClient
@SpringBootApplication
public class MailServiceApplication {

  public static void main(String[] args) {
    SpringApplication.run(MailServiceApplication.class, args);
  }

  @LoadBalanced
  @Bean
  public RestTemplate getRestTemplate() {
    return new RestTemplate();
  }
}
With this annotation, this spring boot application will be able to register itself with Eureka server as a client. Note that a RestTemplate bean has also been configured with @LoadBalanced annotation. This annotation is provided by Eureka Client and it provides a wrapper around RestTemplate. Basically, every time while using this configured RestTemplate a request will be made to Eureka server (before actual request to calling service) to resolve the service location based on the key in URL. If there are more than one instance for that key registered in Eureka server, then a client side load balancing will happen to select one out of those instance.
Now, add below properties to your application.yml file.
server:
  port: 8086 # port at which the service will be available

spring:
  application:
    name: mail-service

info: # basic application info to be made available under /info
  app:
    name: mail-service
    description: Service to submit mail
    version: 1.0.0

address:
  service:
    base-path: http://address-service/

eureka:
  instance:
    leaseRenewalIntervalInSeconds: 1
    leaseExpirationDurationInSeconds: 2
  client:
    serviceUrl:
      defaultZone: http://127.0.0.1:8761/eureka/
    healthcheck:
enabled: true- address.service.base-path: This property contains the key which will be used by RestTemplate to lookup Eureka server for the location of address service.
Adding REST Endpoint
Now let’s add a RestController and expose a rest endpoint for sending mail.
@RestController
public class MailController {

  @Autowired
  private MailDataService mailDataService;

  @Autowired
  private AddressDataService addressDataService;

  @PostMapping("/{member-id}/mails")
  public ResponseEntity sendMail(@PathVariable("member-id") int memberId, @RequestBody Mail mail) {

    Address memberAddress = addressDataService.getAddress(memberId); // looks up address service to obtain recipient's address
    mail.setAddress(memberAddress);
    mailDataService.postMail(memberId, mail);
    return ResponseEntity.status(HttpStatus.CREATED).build();
  }
}
Testing Complete Setup
Now let’s get to the part where you can validate the above setup. This post uses Postman as a HTTP client to test the application. However, you can decide to use any other client that you are comfortable with. Also you can find Postman’s JSON file in the same Github repository under the path /postman.
Request to send a mail
Request
HTTP POST -> http://localhost:8086/{receiver-id}/mailsRequest Body
{
    "from": "sender",
    "timestamp": "2019-02-18T13:29:14.449",
    "message": "Hello World"
}
Response Status Code: 201 Created
Verify sent mails
Request
HTTP GET -> http://localhost:8086/1/mailsResponse Body
[
    {
        "from": "sender",
        "timestamp": "2019-02-18T13:29:14.449",
        "message": "Hello Docker",
        "address": {
            "addressLine1": "3434 Anderson Avenue",
            "addressLine2": "Apt# 420",
            "city": "San Jose",
            "state": "California",
            "zipCode": "92130",
            "country": "United States"
        }
    }
]
Tips & Tricks
- Annotations
@EnableEurekaServerand@EnableEurekaClientare the heart of the application ecosystem. Without those this setup will not work. - Eureka REST Operations provides the list of REST APIs available on Eureka server.
- Eureka server supports UP, DOWN, STARTING, OUT_OF_SERVICE and UNKNOWN as application statuses.
- A vanilla Netflix Eureka instance is registered with an ID that is equal to its hostname. Spring Cloud Eureka provides a sensible default, which is defined as
${spring.cloud.client.hostname}:${spring.application.name}:${spring.application.instance_id:${server.port}}}and results asmyhost:myappname:8080. - You can override this value by providing a unique identifier in
eureka.instance.instanceIdas shown here.
Source code on Github